Check out my vintage posts!
Showing posts with label vintage. Show all posts

Monday, 1 July 2013

Vintage Cosmetics Advertisements

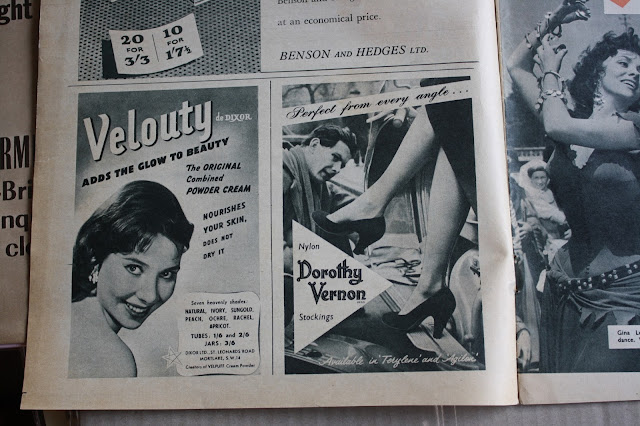
My friend Kate is over from Australia at the moment and she recently popped in to Vinmag in Soho to  pick up some vintage magazines to frame.

I had a leaf through them and found a load of beautiful and at times, hilarious, cosmetics advertisements and thought it might be nice to share them here on the blog.

These ads are from 'Picturegoer' magazine editiones published in 1956 & 1957.


Incredible Tampax Ad


I have no words for this Ryvita ad...

Wednesday, 13 March 2013

BoPeeps - Cute, Ethical and Cheeky Lingerie!

Gone are the days of compromising comfort in the name of pretty knickers thanks to the unashamedly flirty and undeniably comfy BoPeeps knickers and bras.

Already featured in Cosmopolitan Magazine, Zest, the Vogue Blog and Stylist (to name a few) BoPeeps is an underwear brand to keep your eye on!

I've been putting the Butterfly Bra and Heart Shaped Knickers through their paces and I'm happy to report that the rumours are true - these pieces are uber comfortable and flattering to my shape - even my bum is a fan as the cut of the knickers gives it that little extra perk up!

I have the set in 'Nude' but other colours such as Charcoal, Crimson, Clover, Atlantic and White are available as both sets and separates.


The Bra is slip-on but features all important adjustable straps


BoPeeps is a London based brand and many of their items are produced right here in the big smoke while others are handmade in a small family owned and operated factory in Taiwan which is frequented by BoPeeps, which is indeed an assurance to their customers that the products are made lovingly in good working conditions.
The Heart Shaped knickers are £17 while the Butterfly Bras retail at £23.
The fact that they are sold separately and as sets means you can mix and match sizes to get the perfect fit, for example my Butterfly Bra is an S while the knickers are an M.

For more information visit BoPeeps where you'll find the bra and knickers I've featured here as well as Ballet Bras, Thongs and gorgeous vintage frilly knickers!


Thanks for reading! x
*These gorgeous smalls were provided to me for consideration. But I'm a terrible fibber so you should take my word for it.

Saturday, 26 January 2013

Lipstick I Love: Rocking Red by Smooch Cosmetics

A girl can never have too many red lipsticks and I'm no exception.
The latest member of my red lippie clan comes in the shape of this pin-up-perfect red from Smooch Cosmetics.

Richly pigmented and vibrant with a glossy finish, *Rocking Red is one of those shades that I think would suit pretty much every skin tone.

After a few hours of wear, the lipstick sort of stains the lips, leaving them looking lovely and 'bitten' but the gloss factor only sticks around for a short while. The formula is quite 'wet' so my only criticism of the lipstick is that it does tend to bleed and feather a little on my lips, though that's not really a deal breaker in my book.

The packaging? Don't even get me started! This lippie is encased in the cutest, most kitschy tube I've seen in a while.


Rocking Red (and 11 other gorgeous shades) are available for £7.50 from Smooch Cosmetics UK.
Smooch Cosmetics are currently offering a free Glowing Bronzer worth £13.95 when you spend £15 or more so why not treat yourself to two lipsticks and get the bronzer free?

Have you tried any products by Smooch Cosmetics?
Thanks for reading :)

Friday, 18 January 2013

Knitting, Afternoon Tea and Vintage Beauties - Atrixo Event

I attended an AMAZING event last week in celebration of Atrixo hand creams.


 Hosted by the beautiful Vintage Patisserie ladies and complete with a knitting class headed by the seriously talented Catherine Hirst, this gorgeous event introduced me to a cult classic product that I hadn't tried before, despite the fact it has been a handbag staple for over 50 years!
Bloggers were treated to a delicious afternoon tea while learning the ins and outs of basic knitting techniques and were given stunning retro makeovers by the Vintage Patisserie girls.
It was all a bit of a treat really!


With prices starting at around £2, you can find Atrixo products at Boots, Superdrug, Tesco and Ocado.

Thanks for reading!

Thursday, 3 January 2013

Hair Adventures: Practising Pincurls

Being a lazy vintage enthusiast can be tricky, so perfecting something as time consuming (and sometimes as difficult) as pincurls is near impossible for me.
I'm fine when it comes to curling the front of my hair into snail-like swirls but reaching around to do the back hurts my arms and my brain so I enlisted my willing flatmate Anna  to play guinea pig for me.
Luckily, Anna likes having her hair played with so she was happy to sit for half an hour while I twirled her hair into somewhat imperfect little rolls.

The Curl Commandments

  • Pincurling towel-dried hair gives the best results as the curl is easier to manipulate and lasts longer than a dry curl once set. Curling wet hair is known as a 'wet set'.
  • Use a setting lotion/ mousse/ some kind of flexible hold product to make the curls last
  • Try not to twist the hair as you roll - twisting = frizz!
  • Wait until the hair is completely dry before taking the pins out
  • Use pronged curling clips or flat-edged bobby pins to hold the curl in place. Using ridged bobby pins can leave indentations in the hair.
  • If sleeping with the curls in, wrap your head in a satin/ silk scarf to keep everything in place.
The Tools I Used


The Process

  • Comb setting lotion or your product of choice through towel-dried hair
  • Take a small section of hair (about an inch wide), comb it through, then curl it in on itself in your desired direction. The trick is to curl it like a pinwheel or snails shell - you want a smooth, tight curl rather than a twisted one. There are plenty of video tutorials demonstrating this technique.
  • Once you have curled the section all the way to the scalp, lie it flat against the head and secure it with one or two pins/ clips.
  • Repeat this all over the head - more advanced pincurlers do this in rows all over the head but I did mine a little more haphazardly. 
  • Once all the curls are done, spritz with a little hairspray and wrap the head in a scarf ready for bed!
You can find plenty of pincurling tutorials on YouTube so I didn't bother documenting the entire process when I did the curls on Anna but here's a photo of her lovely little (faux) red head after I'd finished:

And this is what it looked like in the morning after some substantial finger combing:

Anna's hair wasn't brushed out, which is usually the next step with pincurls, but as you can see they still gave her some serious volume!

Have you tried pincurls in your hair? They're time consuming but a lot of fun and I think with a little more practice I can create some pretty cool looks!

Thanks for reading :)


Friday, 8 June 2012

Supporting Team GB in Style...

...with a little help from Next.

In preparation for a little thing known as the OLYMPIC GAMES, the inventive lot at Next have created two scarves so we can get all patriotic and literally 'wear' our pride when London hosts the games next month.


There are 2 designs available - the Official Team GB Scarf and the Official Paralympics GB scarf and both come in two different sizes, a small bandana size and a larger scarf size.

I have the small Paralympics GB scarf/bandana and I wanted to show you how I will be wearing it.


I'm a vintage lover and I think the small size is perfect for a little head scarf action a'la Rosie the Riveter ;)


Or of course, you can channel your inner air hostess/ goddess and give your neck a little love.


The designs on both scarves feature a hand painted Lion, reflecting the courage, determination and talent of our athletes.


The Team GB scarf features 900 illustrated figures to symbolise 900 British athletes, 14 Paralympic lions and 26 Olympic sports.


The Paralympic scarf includes 60 hands to represent the athletes' 60 million supporters as well as a map of Great Britain.


Both designs retail at £5 for the small size and £10 for the larger size, with all profits going to the British Olympic Association - an organisation that helps athletes reach their sporting potential.


I think this is a lovely way to support Britain's athletes as London hosts the Olympics this year - will you be visiting Next and wearing your pride this summer?
You can find out more by visiting Next online here.
If you purchase one of these scarves, you can win lovely prizes from Next by simply uploading a photo of yourself wearing the scarf your way. Check out the competition here.

p.s. I know I am an Aussie, and a proud one at that, but England is my adopted home so I'll be rooting for both of these great nations!


Thanks for reading ;*


*Next sent me this scarf to spread the word about these not-for-profit goodies & I was more than happy to oblige!

Friday, 18 May 2012

Nylon Backseam Tights by Pretty Polly

It's official, flesh toned tights are back in a big way (thanks to a certain Duchess of Cambridge) and for me, they're the perfect addition to my Spring wardrobe this year.

Nude tights mean we can get around in a little less clothing this season and look like we've got our pins out without completely freezing our bottoms off in the process.
 Floral dress + nude tight + flats = win.
The trick is in picking the right pair - tights that are sheer and not too glossy are my style of choice ,so they're not completely obvious but disguise imperfections and keep legs warm.

On a mission to find the perfect pair of nudes, I headed to the accessories section of River Island but the vintage glamour obsessive within steered me to a pair of sassy nude tights, with a twist.

I've posted about Pretty Polly tights before (you can read those articles here) and I'm going to do it again now because, quite simply, I love them.

The pair I bought are the Nylon Backseam Tights.


As you can see, these tights are nude and sheer with a black seam running down the back of the leg.
The tights have a black cuban heel and completely black sole.

I think these tights are really fun and could add a touch of vintage glamour to my Spring outfits. 
What do you think?
I got these for just over £5 from River Island, but you can check out the Pretty Polly website right here


Tuesday, 15 May 2012

How To: Easy Victory Rolls


 Hello!


As I've previously mentioned, I'm rather partial to the beauty trends of the 1940s and 50s.

The Hollywood bombshells of these eras oozed sex appeal and stars including Veronica Lake and Rita Hayworth were often photographed with their hair styled into 'Victory Rolls'.


Here's a fun fact: The term 'Victory Rolls' actually refers to a fighter plane maneuver, but women began using it when describing this particular style as a celebration of allied victory in World War II.

Every day's a school day.

Anyway, like any girl I sometimes play around with my hair. I'm certainly not known for having any notable skills in the 'upstyle' department but I wanted to show you the way I wear it a couple of times a month, just for fun and when I'm feeling brave.

Presenting Victory Rolls, Hannah style.

easy victory rolls

A closer look:
victory rolls hair tutorial
These are by no means perfect, but nothing in this world is eh?

In case you're interested, here's what you need, and how to achieve some little victory curls of your own :)

The Tools:


Hair Pins

Tail Comb

Heavy Duty Hairspray

How To:


  •        Curl hair with  a curling iron or GHD (Curling the front sections away from your face will make it easier to create your rolls)
  •          Part hair using tail end of the comb – I've done quite a deep side part today.
  •         Separate the front sections of your hair from the back and put the hair at the back in a ponytail to keep it out of the way.
  •        Take one of your front sections and tease it at the back a little for volume. If you have thick hair like me you can probably skip this step :)
  •        With your hand or a brush, smooth out the front of the section (the part that will be visible) and spray with a little hairspray. This will help the section hold its shape when you start curling.
  •       Once the section is smoothed and slightly tacky from the hairspray, get rolling!
  •       To roll, hold the section straight up with one hand, then place a finger or two about half way down the section and wrap the hair around it, towards your parting.
  •       Once you've got the hair wrapped around your fingers, loosen the 'loop' of hair around your fingers and simply roll it all the way down to your scalp, ensuring it keeps its shape.

  •    Pin the roll in place and go nuts with hairspray!

   If you're looking for a proper tutorial on how to do your own victory rolls, there are plenty out there on YouTube.

I think this one by Cherry Dollface is really quite good :)


What do you think of Victory Rolls? Have you tried them before? If you've not, you should give them a go, if anything for a bit of fun one rainy day. If I can do these, I guarantee you can too!

Thanks for reading !


SITE DESIGNED BY PRETTYWILDTHINGS